Installation of the Flex Fence kit
If you have any questions about the installation of the Flex Fence Kit we hope to answer them here.
Each FLEX•fence® 4ft. kit includes: 2 pcs. 4 ft. pre-punched rails, 1 pc 4ft. operating bar, 22 brackets, all fastening hardware.
THE INSTRUCTIONS HAVE BEEN WRITTEN FOR FENCE OR DECK RAILING USE. THE INSTRUCTIONS CAN BE EASILY ADAPTED FOR OTHER APPLICATIONS.
Each package of FLEX•fence® has been designed to operate for openings of 48 inches (maximum of 48 inch centers). If your opening is shorter, larger, or if you want no gap when the boards in a closed position see Section B.
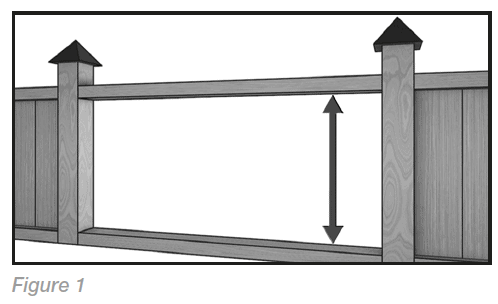
STEP 1 Determine if you wish to install your FLEX•fence® as either vertical (Figure 1) or horizontal (Figure 2) panels.

STEP 2
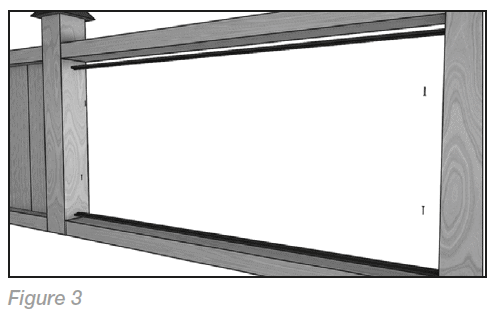
Fit rails onto top and bottom (Figure 1) crossbar or fence post (Figure 2). Using a marking instrument denote rail placement ensuring that they are well centered and the pre-punched swivel holes are directly opposite to one another (Figure 3).


STEP 2
Fit rails onto top and bottom (Figure 1) crossbar or fence post (Figure 2). Using a marking instrument denote rail placement ensuring that they are well centered and the pre-punched swivel holes are directly opposite to one another (Figure 3).
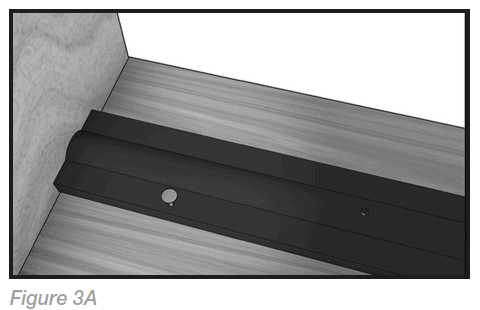
NOTE: You may wish to use our location holes for position purposes during the installation (figures 3 & 3A).
* If you are attaching the rails onto 2’ x 6” frames the rails should not be centered but offset on one side to allow access to fasten the operating bar (See STEP 6).


STEP 3
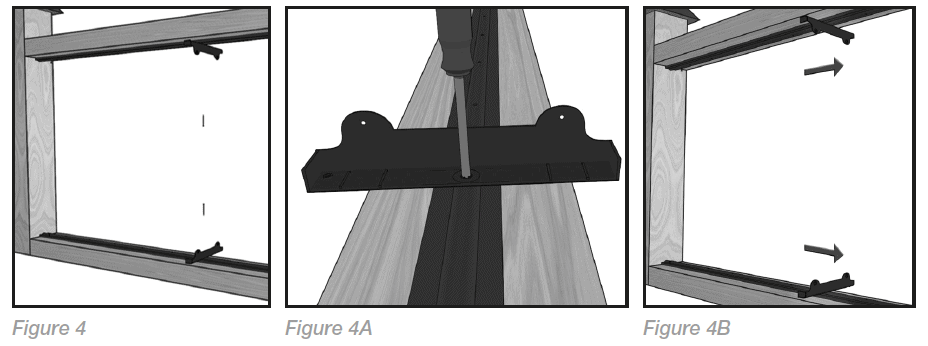
Once the rails have been positioned, mount a bracket onto one of the middle pre-punched swivel holes on each rail by using the rail screws supplied (#10, 1½ inch) (Figure 4). Drive the screw perpendicular through the bracket hole and matching rail swivel hole, in order to hold the bracket and rail in place.
IMPORTANT: REVERSE SCREW BY 1/4 OF TURN, JUST ENOUGH TO ALLOW THE BRACKETS TO TURN EASILY (SWIVEL).
NOTE: When fastening the brackets onto the rails, ensure that the side of the bracket that have two end position holes are facing the same direction.

STEP 4
Taking a piece of 1” x 6” fence boards or 5/4” deck boards, cut to length 1/16th to 1/8th inches shorter than the distance of the opposing brackets. Fit the boards onto the brackets, and secure with the mounting screws supplied (#8, 5/8 inch) (Figure 5). Ensure the mounting bracket screw slots are facing inside your enclosed area (Figure 4A).
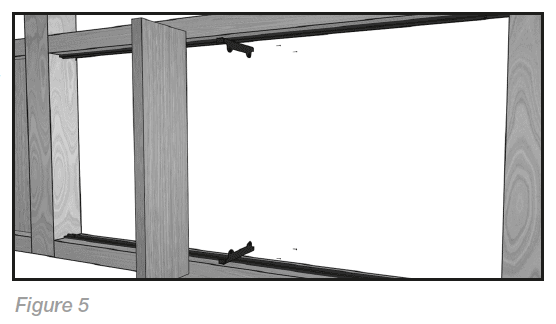

STEP 5
Mount the remaining brackets and boards onto the rails following STEPS 3 & 4.
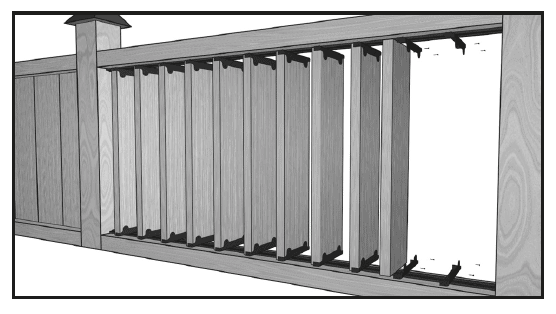

STEP 6
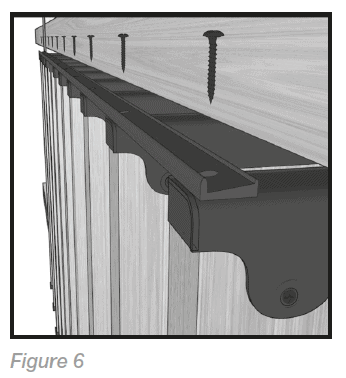
To install operating bar, turn the boards outward and parallel to one another, with the top holes at the end of the bracket facing inwards towards your enclosed area. Fasten the pre-punched operating bar onto the bracket using the bar screws supplied (#6, 3/4 inch) ensuring the lip of the operating bar is facing upwards (Figure 6).
To prevent the chances of wood splitting, it is highly recommended that pilot holes are drilled wherever screws are being inserted into wood.

Section B
OPENINGS OTHER THAN FOUR FEET
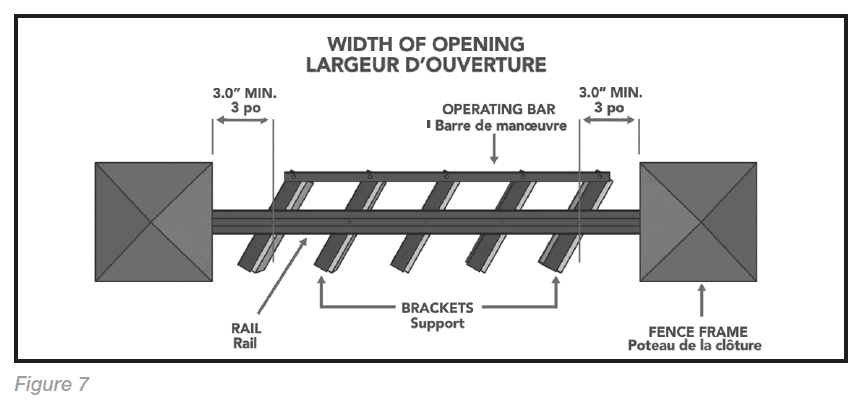
Measure the distance from the end brackets (closed position) to the post and cut a strip of wood that will easily fit the gap and mount onto the post or crossbars (Figure 7) or see dimension chart note section. NOTE: FLEX•fence® has been designed to allow only a maximum of 4 inch gap (in open position) between boards.


1. To determine # of 1”x6” boards required: • Divide total opening width by four (4) and round to the nearest whole number (for .5 round to lower number) then subtract one (1). EG. FOR A 31” WIDE OPENING: 31” ÷ 4 = 7.75, ROUND TO 8 – 1 = 7 BOARDS
2. To determine distance from frame/post to first hole in FLEX•fence® rail: • Subtract one (1) from number of boards required, then multiply by 4”• Subtract this number from the total width of the opening, then divide by two (2). EG. FOR A 31” OPENING THAT REQUIRES 7 BOARDS: 7 – 1 = 6 X 4” = 24”, 31” OPENING – 24” = 7” ÷ 2 = 3.5” FROM FRAME TO FIRST HOLE IN RAIL
WARNING: If you size FLEX•fence® always cut the rails and operating bar with hand tools and never with power tools.
Section C
IMPORTANT: If the 1” x 6” boards are wider than the FLEX•fence® brackets (> 5½ inches). Either:
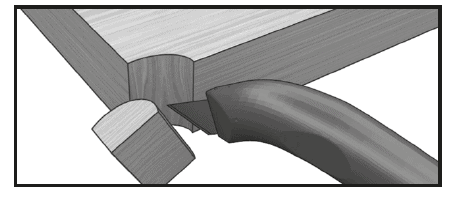

1) Slightly notch the board edges to allow for fitting into the bracket.
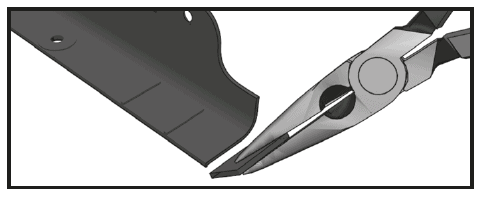

2) With a pair of pliers snap off 1 end cap per bracket.
Section D


FAQ’s
What dimensions of wood do the brackets accommodate?
FLEXfence has been designed to work with 1″ x 6″ fencing boards and/or 5/4” decking boards.
What is the maximum horizontal span for the slats?
If you are running the boards horizontally, we recommend shorter spans to help prevent sagging. Spans greater than 4′ are not recommended. The wood species also affects the wood span. PT lumber has a tendency to warp and/or twist when wet, whereas cedar and redwood are more stable. PT spans greater than 4′ are not recommended.
What if I need horizontal spans longer than 4' or 5'?
If it is not possible to shorten the spans than you can substitute the 1″ x 6″ with 5/4″ deck boards. The 5/4″ boards will be stronger and should be more stable. There may still be some sagging, depending on the length of the horizontal span.
What is the maximum vertical span for the slats?
We recommend a maximum span for vertical slats is 6′.
What are the best wood species to use with FLEXfence?
The choice of wood will depend on the application, the direction of the slats (horizontal vs vertical) and your budget. Cedar or Redwood are best as they have excellent exterior application qualities and tend not to warp. PT lumber is not recommended as it can warp or twist if not completely dried (internally).
Can FLEXfence be used with composite boards?
Composite boards should only run vertically because of the load, otherwise they will sag over time. If the boards run horizontally, the spans should be kept short because of the weight. Composite boards are not recommended for overhang applications.
What is the gap between the pre-punched holes?
FLEXfence pre-punched holes are 4″ apart. With wood attached, the gap in an open position is approximately 3 ¼”.s.
Can FLEXfence rails be cut?
FLEXfence rails can be easily cut using a hacksaw.
How do I put together several 4' kits of FLEXfence so it looks like a continuous run?
When butting pieces together, cut the adjoining ends to create a 4″ space between center holes.
Is there a mechanical method for opening and closing the louvers?
Simply open and close the louvers by grasping one of the slats.
shade
Create a shaded area for the hottest part of that day.
warmth
Protect yourself from a cold breeze by simply closing the slats.
comfort
Create a private space when using a hot tub or seating area
entertainment
The prefect space for entertaining that can adapt for your needs

